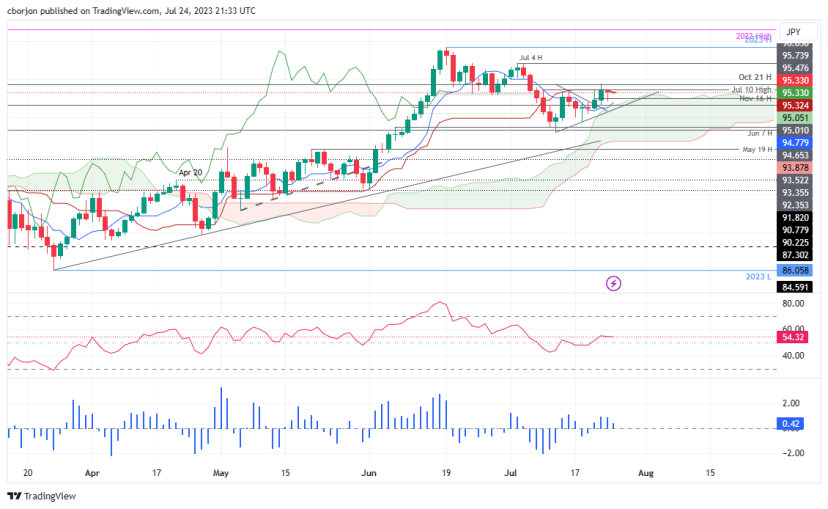
- AUD/JPY trendline suggests a neutral to downward bias as the pair struggles to break the Kijun-Sen line at 95.32.
- Bearish harami formation with a hanging man indicates potential sellers’ momentum, heightening the pullback risk.
- Mixed oscillators and bearish technical indicators, including a bearish Chikou Span, hint at potential AUD/JPY losses in the near term.
AUD/JPY registers minuscule losses of 0.07% after touching a daily low of 94.86, but a late risk-on impulse boosted the Australian Dollar (AUD) toward the current exchange rate. The AUD/JPY is trading at 95.30, down 0.05%.
AUD/JPY Price Analysis: Technical outlook
In the near term, the outlook for the AUD/JPY is neutral to downward biased after the pair struggled to break above the Kijun-Sen line at 95.32 for the last couple of days. Aldo, a formation of a bearish harami with a hanging man, suggests sellers are gathering momentum.
That said, the AUD/JPY first support would be the 95.00 figure, followed by the Tenkan-Sen at 94.78. A breach of those levels would expose the top of the Kuo at 94.50/60, followed by the 94.00 figure.
Conversely, if AUD/JPY reclaims the Kijun-Sen, at 95.32, the next resistance would emerge at the October 21 daily high at 95.7, ahead of challenging the 96.00 mark.
Oscillator-wise, the Relative Strength Index (RSI) portrays the pair as bullish; however, the three-day Rate of Change (RoC) shows buying pressure is waning, opening the door for a pullback.
Hence, technical signals suggest the AUD/JPY might be headed downwards, with the Kijun-Sen standing above the Tenkan-Sen, price action below the former, and the Chikou Span turning bearish; the AUD/JPY is headed downwards. That, alongside mixed oscillators, could pave the way for AUD/JPY losses.
AUD/JPY Price Action – Daily chart